Principles and Techniques Used to Create a Natural Hairline in Surgical Hair Restoration
Introduction
Creating a natural hairline has always been one of the most important elements of a successful hair transplant. Our ability to create a natural hairline has dramatically increased over the years. Many of us promise full and undetectable hairlines in our promotional materials. Not unexpectedly patient’s expectations have also increased. Today, patients expect an undetectable hairline that has enough substance (density) to stand on its own after one session. They will no longer tolerate an embarrassing grafty phase.
We are better equipped now, than in the past, to create hairlines that meets these higher expectations. In part, this is simply due to the use of greater numbers of smaller, more natural looking follicular unit grafts (FU’s) in the hairline region. FU’s have given us finer paintbrushes with which to create a hairline. However, equally important has been a better understanding and recognition of the visual characteristics that make up normal hairlines. Simply using FU’s without a deliberate attempt to reproduce these characteristics does not guarantee a normal hairline (Fig.-1). In other words, to create the most natural looking hairline, we cannot simply use a finer paintbrush; we must also know how to utilize this finer paintbrush.
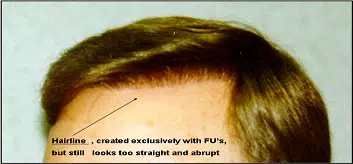
Fig 1: This is an example of a hairline created exclusively with FU’s but still looks too abrupt and straight: Using FU’s does not automatically mean “naturalness”.Proper distribution and placement is also necessary.
The article discusses the principle visual characteristics of a natural hairline and some of the techniques used to reproduce them. In addition, a systematic, step by step approach for consistently creating natural hairlines is described at the conclusion of the article.
Conseptualize a larger, "extended" hairline region that contains a "transition zone", "defined zone" and "frontal tuft" Area
There are a number of excellent articles that exist on hairline design.[1, 2, 3, 4, 5, 6, 7] However the majority focus only on the most anterior border of the hairline, commonly referred to as the transition zone. In contrast, I find it useful to conceptualize the hairline as a larger, more extended region, approximately 2-3 cm deep, bridging the bald forehead to the area of central density. (Fig.-2) [8. 9]
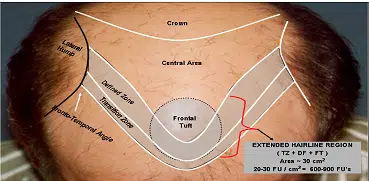
Fig 2: “EXTENDED” HAIRLINE ZONES: I conceptualize an “extended “hairline as consisting of the Transition Zone (TZ), Defined zone (DZ) & the Frontal Tuft (FT). The TZ should be soft and irregular. The DZ should be more defined & dense. The FT should have the most definition.All these zones are important to the overall appearance of the hairline. The area of this extended hairline is ~30cm2 & requires 600-900 FU to create an initial density of 20-30 FU/cm2
This extended hairline region can than be divided into three smaller zones:
- The anterior portion which is the traditional transition zone.
- The posterior portion called the defined zone.
- A small oval area in the central portion of the defined zone called the frontal tuft area.
All three zones make their own unique contribution to the overall appearance of the hairline.
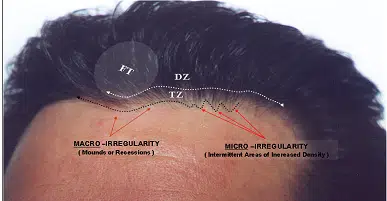
Fig 3: PROPERTIES OF A NATURAL HAIRLINE:The above picture is the author’s non-transplanted normal hairline. The white dotted line separates the transition zone (TZ) from the defined zone (DZ).The black dotted line follows the “macro-irregular” anterior border of the TZ. Notice the “micro-irregularity” created by areas of intermittent increased density within the transition zone.
Transition Zone
The transition zone consists of the first .5-1 cm of the hairline (Figs.-2 & 3). It should initially appear irregular and ill defined but gradually take on more definition and substance as it reaches the defined zone. Close observation of normal transitions zones reveal a number of specific elements that work together to create this overall affect. They are described below.
- Micro-irregularity – It is important to vary the density along the transition zone. Close examination of normal hairlines reveals that small, “intermittent”, triangular shaped areas of higher density contribute a great deal to the appearance of irregularity. (Fig.-3) This form of irregularity is referred to as “micro-irregularity” because it is more noticeable under close examination than from a distance. Parsley has called these areas of “intermittent” density “clusters” and the area between them “gaps”. [10] There is a natural tendency to “fill in the gaps” caused by this micro-irregularity in the transition zone. This impulse must be overcome to prevent the creation of a too straight or solid appearing hairline.(Fig.-1)
- Macro-irregularity – If one stands back and looks at a normal the hairline from a distance the path of the anterior border is seen to be more serpentine or curvaceous than linear. This form of irregularity is referred to as”macro-irregularity” because it is more obvious when the hairline is observed more globally from a distance (Fig.-3). Martinique has used the term “snail-tracking” to describe this appearance.[11] Parsley has attributed this macro-irregularity to existence of one to three “mound” or “protrusions” along the path of the hairline.[10] He describes one central mound (the widows peak) and up to two lateral mounds on either side of this central mound. Micro- and macro- irregularity work together in the transition zone to create a natural looking hairline.
- Only one-hair FU’s should be used in the anterior portion of the transition zone with a shift towards two-hair FU’s toward its posterior portion. Occasionally a few isolated ,very fine single hairs called “sentinel ” hairs can be found scattered in front of the transition zone
- The width and density of the transition zone should be adjusted based on the severity of hair loss. The greater the degree of hair loss, the wider and more diffuse this transition zone should be, mimicking the pattern found when more severe hair loss occurs in nature.
Defined Zone
The defined zone is the 2-3 cm wide area that sits directly posterior to the transition zone (Figs.-2 & 3). In this area the hairline should develop a higher degree of definition and density, yet still appear totally natural (undetectable) under close examination. Concentrating two and three- hair FU’s in this area nicely accomplishes both goals. Density in this zone creates a fuller looking hairline by limiting the distance that can be seen past the transition zone. It creates this affect without placing hair directly in the transition zone, thereby limiting the chance of creating too straight or solid appearing a hairline.
Frontal Tuft Area
The frontal tuft is a small but aesthetically significant oval area that overlies the central portion of the defined zone directly behind the transition zone in the midline. (Fig.-2 & 3) In addition to being undetectable this area should have an even higher degree of density than the rest of the defined zone. James Arnold impressed upon me the aesthetic importance of density in this frontal tuft area with the following example. [12] He would say “Consider a patient who is totally bald except for a fairly full frontal tuft area… Imagine he is standing in an elevator facing the door with you on one side and him on the other. .When the door opens your first impression, looking at him straight on, would be of a person with a fairly full head of hair. It would only be when you walked by him that you noticed he was bald everywhere else.”
Use FU's Instead of small slit minigrafts in all three areas of the extended hairline
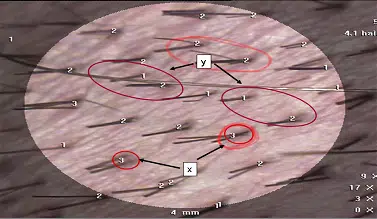
Fig 4: FU’S vs SMALL SLIT MINIGRAFTS: (x) Three and four hair FU’S “cut to natural groupings” are smaller than (y) small size minigrafts “cut to size” with equivalent amount of hair .
Use "Properly" trimmed FU's
Saying one should use exclusively FU’s in the extended hairline region (as stated in the previous paragraph) is not explicit enough since all FU’s are not created the same. FU’s containing the equivalent numbers of hairs can also vary significantly in geometric size and shape depending on the skill of the cutter and the specific technique used to create them. In my opinion, FU’s used in the hairline region should be “properly” trimmed. This does not mean creating “skinny” or “stripped” FU’s. This means creating “tear drop” shaped FU’s that have been trimmed of excess surface epithelium, but leaves a little more tissue around the inferior portion of the graft. (Fig.-5) [14] FU’s units deliberately trimmed in this manner have a number of advantages over micrografts that are either trimmed too much (stripped) or not trimmed enough:
- They are smaller than untrimmed micrografts with equivalent amounts of hair. This enables them to be placed in smaller incisions that can be made closer together.
- The minimal amount of epithelium left on these FU’s limits the potential for pitting, which can still occur when untrimmed micrografts are placed too deeply.
- The extra tissue around the inferior portion of these grafts theoretically makes them less susceptible to graft trauma and dehydration and therefore increases their chance of survival.
- Unseen telogen hairs are at less risk of being discarded. This is particularly advantageous for the two to three hair FU’s placed in the defined zone and frontal tuft area where a few extra hairs for added density is beneficial.
- An instance where more extensive trimming may be desired exists for the one hair FU’s that are going to be used for sentinel hairs or the most anterior portion of the transition zone. These grafts are trimmed a little more aggressively to ensure they are indeed pure one hair FU’s with no unseen telogen follicles.
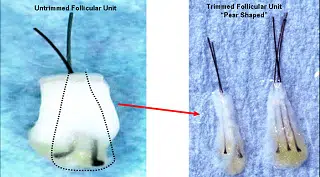
Fig 5: “PROPERLY” TRIMMED FU’S vs N0N-TRIMMED FU’S: FU’s should be created in a “teardrop” shape that has minimal surface epithelium but still has tissue around the sebaceous gland and root. FU’s created this way are smaller than untrimmed FU’s which enables them to be placed closer together in tinier, less traumatic incisions.
Use "Enough" FU's in the hairline region during the first session to ensure both naturalness and substance
I think one of the reasons for dissatisfaction with hairlines in the past has been a slight shortfall in the number of FU’s used in this region. Sufficient numbers of FU’s should be placed in the extended hairline region (transition zone + defined zone + frontal tuft) during the first session to ensure that it will be natural as well as have enough substance to stand on its own independent of further sessions. In my opinion , to accomplish this requires a density of approximately 20-30 FU’s/cm2. The extended hairline region usually measures about 30 cm2 in size if you include all three zones. If you do the math, this dictates that approximately 600-900 FU’s need to be placed in these zones during the first session to create this density (20-30 FU/cm2). (Fig.-2) & (Table-1)
| DENSITY DESIRED | FU’S NEEDED |
|---|---|
| 20 FU’s/Cm2 | 600 FU’s |
| 25 FU’s/Cm2 | 750 FU’s |
| 30 FU’s/Cm2 | 900 FU’s |
Table 12D-1: FU’s needed to create a density of 20 to 30 FU’s/cm2 in an xtended hairline area of 30 cm2
This number of FU’s is based on a conservative degree of “dense packing” (20-30 FU’s/cm2) and one that I think most physicians have accepted as safe for FU viability. Higher degrees of “dense packing”, defined here as 30-40 FU’s/cm2, may produce good hair survival in skilled hands[15], but this is more controversial and usually is not necessary to produce a good cosmetic result.
In reality these 600 -900 FU’s are not evenly distributed throughout the entire hairline region. A deliberate effort is made to mimic normal density gradients and position incisions slightly closer together in areas where higher density is aesthetically significant (i.e. the frontal tuft area, the areas of “intermittent higher density” or “clusters” found along the transition zone and described earlier). (Fig- 3) In these specific areas of the extended hairline region the density will be slightly higher (~25 to 30 FU/cm2) while in the rest of the extended hairline region, by default, the density will be slightly lower (~20 to 25 FU’s/cm2).
Use "Selective separation" and "Selective Distribution"
Separating and selectively placing one, two, and three-hair FU’s allows us another method of controlling the distribution hair density in order to mimic the density gradients found in normal hairlines. There are some techniques of creating “micrografts” (such as the impulsive graft cutting device described by Mangubat [16]) that do not allow for the separation of different size grafts. In these circumstances one-, two-, and three-hair micrografts are “lumped together” and we lose the benefit of “selective distribution”. I typically use the following selective distribution of grafts in the various zones. (Fig.-6)
- The anterior portion of the transition zone should contain only one-hair FU’s with a shift to two-hair FU’s toward the posterior aspect of this zone. If enough one-hair FU’s can’t be found naturally, they can be created by carefully dissecting away finer hairs from existing two and three-hair FU’s. Careful division of hairs within an FU does not appear to impair the viability of the resulting follicles. [17]. One hair FU grafts can vary in thickness. Having your assistants specifically search for and separate approximately 75-100 of the finest one-hair grafts, for use in the most anterior portion of this zone, adds to your ability to produce naturalness. In addition, it has been postulated that using some one-hair FU’s, with the bulb removed, at the most anterior portion of the transition zone, may be useful if hairs of especially fine caliber are needed. [18,19]
- Larger two to three-hair FU’s should be placed in the defined zone, concentrating a greater proportion of three-hair FU’s in the midline central portion of this zone (the “frontal tuft” area).
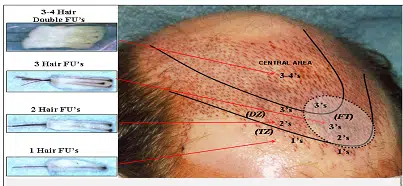
Fig 6: SELECTIVE DISTRIBUTION: Separating and selectively placing one, two, and three hair FU’s allows control over the distribution of density. The “Transition zone” (TZ) should contain primarily one-hair FU’s. Two to three hair FU’s are used in the “Defined zone” (DZ) and “Frontal Tuft” area (FT) with a shift toward a greater amount of three’s in the (FT). Density in the (FT) area has a high aesthetic impact.
Use "Follicular Pairing"
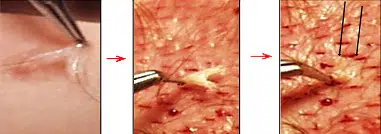
Fig 7: FOLLICULAR PAIRING:With “follicular pairing” a two-hair “paired” FU and can be artificially be created b`y combining two individual one-hair FUs and placing them in the same incision (double arrow).

ROPER ANGLE, DIRECTION
Angle and direction are distinct entities. Angle refers to the degree of elevation a hair as it exits the scalp. Direction refers to which way the hair points when leaving the scalp. It is important to pay attention to the changes in both direction and angle of hair positioned around the hairline. (Fig.-9)
- The hair along the frontal hairline is usually directed anteriorly and leaves the scalp at approximately a 10-15° angle. Existing miniaturized hairs can be used to find the proper angle and direction of hair in this area as well as occasionally assist in recreating cowlicks.
- The hair along the temporal hairline is pointed more inferiorly toward the ear and leaves the scalp at a very acute angle (almost flat). As one moves around the frontal-temporal angle, there should be a gradual transition in direction from pointing anteriorly in the frontal arm to pointing inferiorly (and occasionally posteriorly) in the temporal arm of this angle. Simultaneous, gradual change in angle from approximately 10° in the frontal component to almost flat in the temporal component. There are nearly always residual miniaturized hairs that can act as guides for finding this transition.
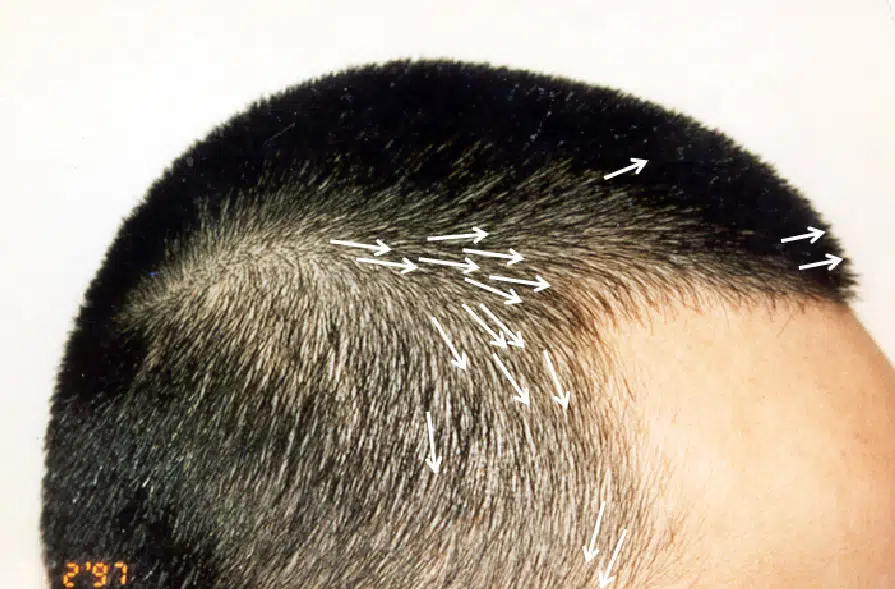
Fig 9: ANGLE AND DIRECTION: Notice how both the angle and direction of hair change as it moves around the hairline. Visualizing the point where this change occurs around the front-temporal angle is particularly important and well illustrated in this photo of a nomal hairline in a male with crew-cut.
Cowlick
Cowlicks often present a challenge when creating a hairline. If a patient has a residual cowlick that is very weak and looks like it will be gone within a couple of years I usually ignore it. However if a cowlick is strong and may be around for quite a while I will attempt to use the presence of existing hairs to follow its direction. (Fig -10)
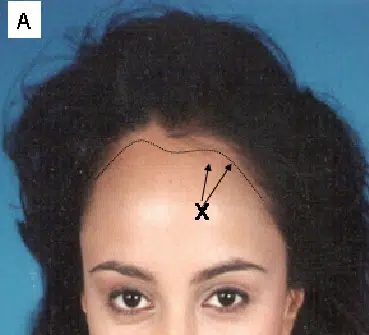
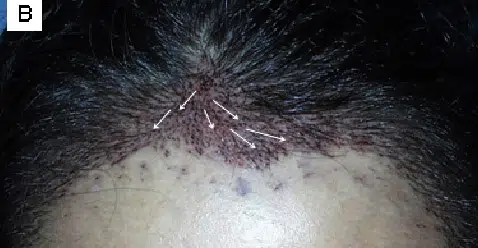

Fig 10: RECREATING A COWLICK:(A)This female patient who wanted her hairline lowered, had a strong existing cowlick. (B) Her nativeresidual hairs were used to help follow and recreate the direction of her normal cowlick (white arrows). C) 1 year after transplant
Proper placement of the anterior border of the hairline
One of the most important principles of hairline placement is “Don’t place the hairline too low”. Common guidelines for locating the anterior border of the hairline include: (Fig.-11)
- Four finger widths above the glabella
- 8-10 cm above the glabella
- A line drawn to the curve of the forehead from the point where the horizontal plane of the scalp meets the vertical plane of the face.
These rules for determining hairline placement are only guidelines and have to be individualized depending on the size and shape of the head and degree of alopecia. In patients with more severe degrees of hair loss, raising the hairline by as much as 1-2 cm may be appropriate. Sometimes a properly constructed “widow’s peak” can be used to create the illusion of a slightly lower hairline without using up too many grafts.
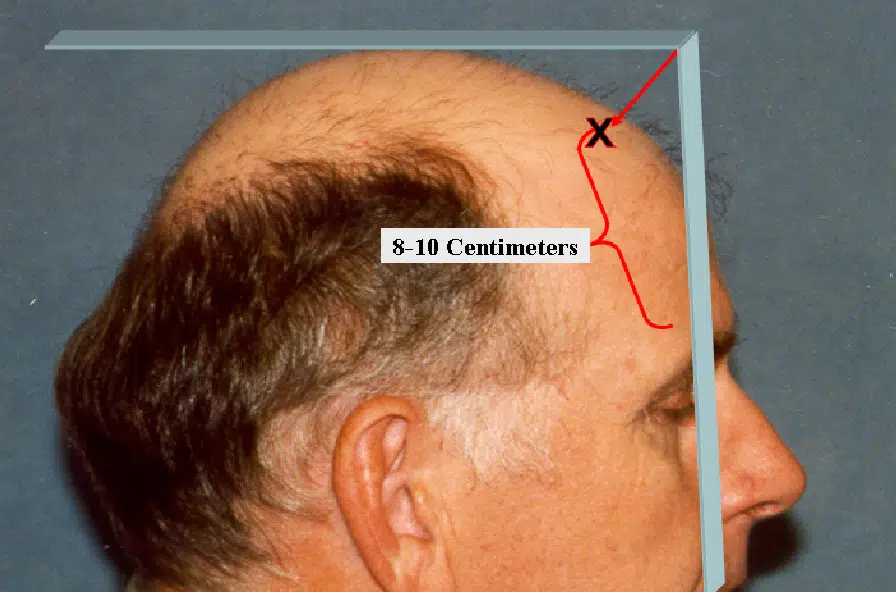
Fig 11: ROPER PLACEMENT OF THE ANTERIOR BORDER OF THE HAIRLINE:Common guidelines for locating the anterior border of the Hairlinem include: 1) four-fingers width bove the glabella, 2) 8-10 cm above the glabella, 3) A line drawn to the curve of the forehead from the point where the horizontal plane of the scalp meets the vertical plane of the face.
Proper placement of lateral border of the hairline and the fronto-temporal angle
All-mature male hairlines have a fronto-temporal angle, which is formed by the junction of the frontal and temporal hairlines. The frontal hairline is the superior border of this angle and the temporal hairline is the inferior border. The apex of this angle moves posteriorly as the frontal and temporal hairlines thin and recede. Properly positioning this point and recreating a soft frontal temporal angle is one of the more difficult aspects of hairline recreation. FU’s are particularly useful for this task. Blunting this angle or placing it too low will cause an unnatural look.
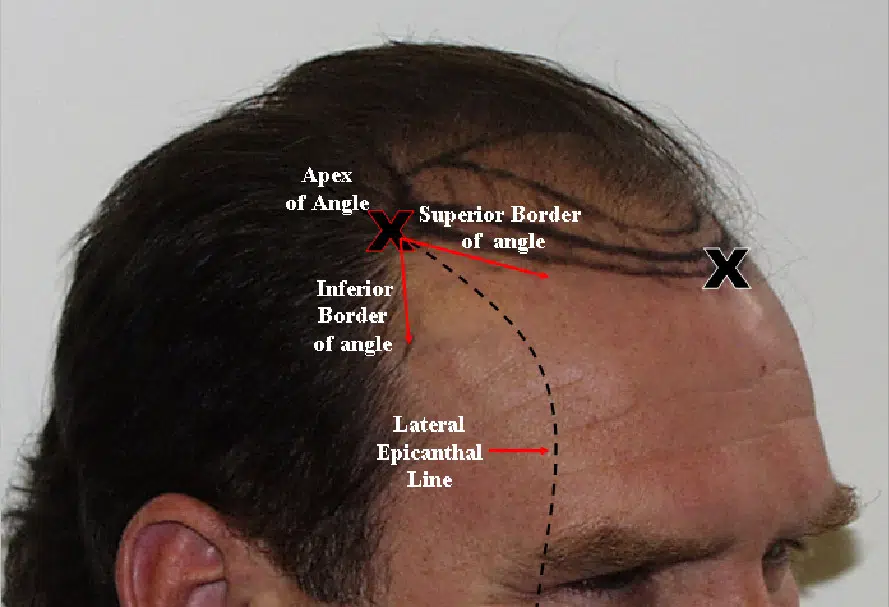
Fig 12: PROPER PLACEMENT OF THE FRONTO-TEMPORAL ANGLE IN MILD-TO-MODERATE HAIR LOSS: Common rules include: 1) Draw a line from the lateral epicanthis of the eye to a point where it meets the remaining temporal hair, 2) Make sure the hairline does not slope down toward the ear but appears parallel or slopes upward. The existing temporal hair becomes the inferior border of the angle.
Some of the common rules for estimating where the frontal hairline should meet the temporal hairline are:
- Drawing a line from the lateral epicanthus of the eye back toward a point where it meets the remaining temporal hair. (Fig.12)
- Making sure the hairline created by this point does not slope downward toward the ear but looks parallel or slopes upward when viewed from the side.
- In mild-to-moderate hair loss, where there is only a little loss of the temporal hair, these rules work well. The existing temporal hair usually becomes the inferior border of the angle while the “future” anterior hairline will become the superior border of the angle. The apex of the angle lies on the line that was drawn superiorly from the lateral epicanthus of the eye.
- In more severe degrees of hair loss, where the temporal hair has receded and the lateral fringe has dropped, finding this point can be more difficult. There is no temporal hair with which the lateral epicanthal line can intersect. Visualizing and recreating what I call the “Lateral Hump” can help in these situations. (Figs.-13A, B) [8, 9] The “Lateral Hump” is located superior to the ear and is a semi circular area of hair that bridges the lateral fringe to the mid-scalp region. It is the last part of the lateral fringe to recede. If you look at normal lateral profiles you can see that one can be very bald and still retain this natural “Lateral Hump.”
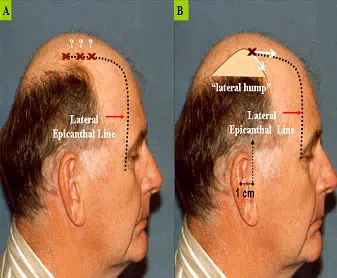
Fig 13 A, B: PROPER PLACEMENT OF THE FRONTO-TEMPORAL ANGLE IN SEVERE HAIR LOSS:(A) It is difficult to know where to place the apex of the fronto-temporal angle in severe hair loss where the lateral fringe has dropped.There is no temporal hairline for the lateral epicanthal line to intersect. (B) Visualizing and recreating the “lateral hump” gives you a helpful landmark to intersect
- Visualizing and recreating such a “lateral hump” gives the lateral epicanthal line a “target” to intersect. They usually meet near the top of the hump or approximately 1 cm anterior to a line drawn vertically from the auditory meatus. The lateral hump usually becomes the inferior border of the fronto-temporal triangle.
Adjusting the hairline downward
Patients often want a lower hairline further down than we originally recommend. There are two methods of using FU’s to safely accomplish this goal:
- Creating a small widow’s peak in the midline is a relatively “graft-economical” way to produce the illusion of a lower hairline. (Fig.-14)
- Some patients may ask you to fill in the temporal recessions and move the lateral aspect of the hairline inferiorly. As noted earlier, you have to be careful about filling in or blunting the normal frontal- temporal angle. I find one way for me to lower this area in a relatively cosmetically safe and “graft-efficient” manner is to visualize the current angle and imagine sliding it slightly anteriorly. (Fig.-14)
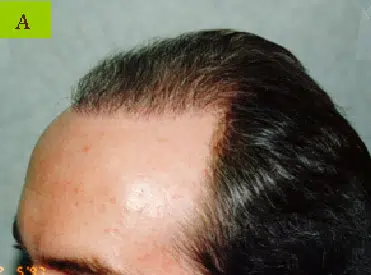
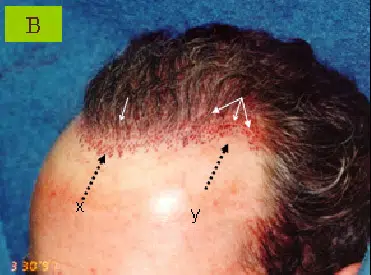
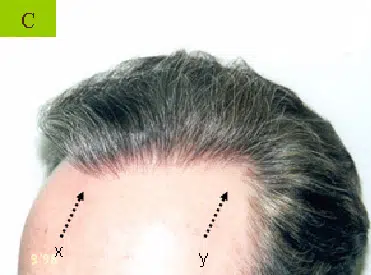
Fig 14: LOWERING THE HAIRLINE BY CREATING A WIDOW’S PEAK AND MOVING THE FRONTO-TEMPORAL ANGLE FORWARD: A) Before surgery with a relatively high and flat hairline, B) Immediately after surgery showing (x) lowering of widow’s peak area and (y) fronto-temporal angle but maintaining the angle [white arrows], and C) one year after surgery showing aesthetic change that relatively little hair in the widow’s peak.
Recreating a receeded temporal hairline and temporal points
Recession of the temporal hairline and temporal points can contribute a great deal to the appearance of baldness by making the forehead look larger. In the past we were reluctant to transplant the temporal hairline and temporal point for fear of progressive hair loss and an unnatural look. In properly selected patients FU’s can now be used to recreating the temporal point and bringing out the temporal hairline. (Fig.15) This often can make the forehead area appear smaller and do so without actually lowering the frontal hairline or blunting the temporal angles. It is a useful skill to develop but judgment needs to be exercised when deciding who is or is not a good candidate.
Mayer states that a general rule for deciding where to place the tip of the temporal point is at the intersection of the following 2 lines: [20] (Fig.15)
- Line 1 is drawn from the proposed most anterior frontal hairline to the tip of the ear lobe.
- Line 2 is drawn from the tip of the nose, over the center of the pupil.
This usually places the point slightly lateral and above the lateral aspect of the eyebrow.
The angle of hair in this area should be flat or as close to 00 as possible. The direction of hair points downward and posterior toward the ear. Once again, there are often existing miniaturized hairs that further help one find the angle and direction of hairs in this area.
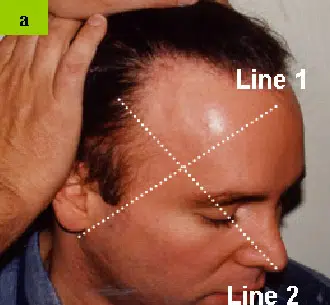
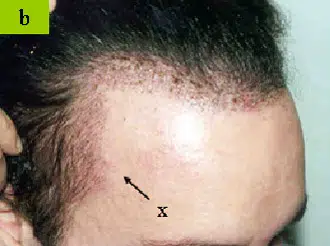
Fig 15: RECREATING TEMPORAL POINTS AND TEMPORAL RECESSION: A) Shows before picture with approximate location of temporal point located by intersection of Line 1 and Line 2 (See text for rules) B) Immediately after surgery showing newly placed grafts outlining x) fronto -temporal angel and (y) temporal point. C) One year after surgery
Step-by-step systematic approach for creating a natural hairline
The following is a step-by-step systematic approach that I have found useful when creating my hairlines. It is not meant to be dogmatic. Other methods exist that also work well. With this approach an initial framework is built that is then repeatedly fine -tuned at various steps along the way. I prefer this approach in contrast to completing my design in one pass. I use the analogy of writing a paper. I find that if I put if I leave it for a while and then come back to it I appreciate improvements that can be made to it.
1. Draw the hairline design. (Fig.-16A)
Mark the anterior border, lateral border, and fronto-temporal angle as described earlier. Draw the hairline zones (Transition Zone, Defined Zone, Frontal Tuft, Lateral hump, etc) using the principles described earlier. If a lower hairline is desired and deemed appropriate it can be created by drawing in a widows peak and sliding the frontal – temporal angle slightly foreword.
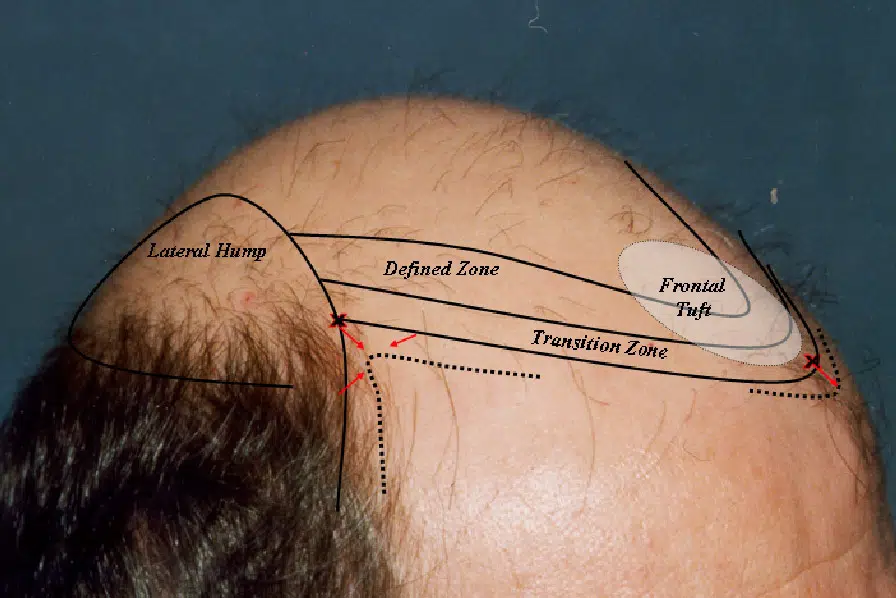
Fig-16A: DRAWING THE HAIRLINE ZONES AND BRINGING THE HAIRLINE FORWARD: 1) Lateral Hump, 2) Transition Zone, 3) Defined Zone, and 4) Frontal Tuft areas. After the initial drawing, a more aggressive & lower hairline can be created relatively safely with minimal grafts by creating a small widow’s peak and by shifting the fronto– temporal angle forward (dotted lines).
2. Make initial “marking incisions” along the anterior border of the transition zone. (Fig.-16B)
These “marking incisions” should be about 1 cm apart and slightly irregular. Placing some anterior to and some posterior to the drawn line begins the process of creating macro-irregularity. Making these “marking incisions” first ensure you will not lose the position of the hairline if your drawing is accidentally wiped off during procedure. They allow you work safely in other areas without fear of losing your initial design.
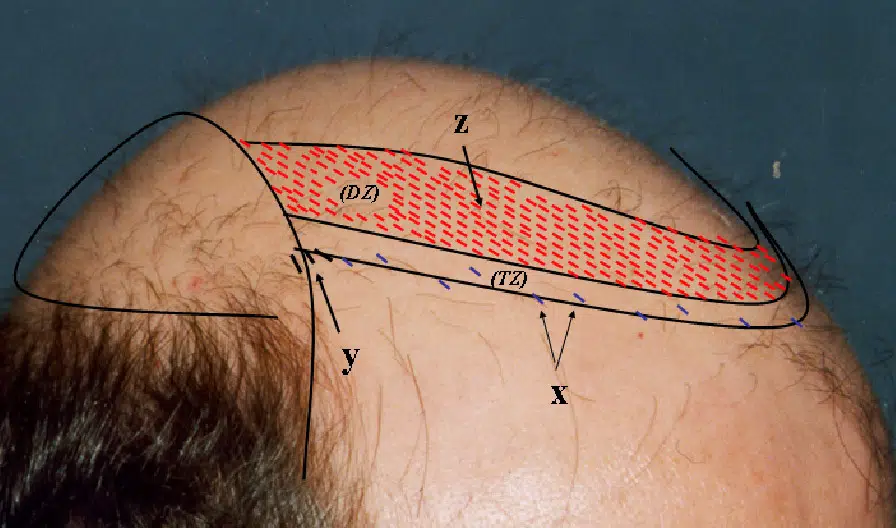
Fig 16B: STEPS IN CREATING THE HAIRLINE:(x ) “Marking incisions” along the anterior border of the transition zone (TZ). (y) “Marking \incisions” around the “fronto-temporal” angle using existing hairs as guides . (z) The incisions in the defined zone (DZ) are created before doing work in the transition zone
3. Make initial “marking incisions” at the fronto-temporal angle. (Fig.16 B)
Look for exiting hairs on both sides of the apex of the fronto-temporal angle, to help determine the change in direction of the incisions as you move around this angle. Make some “marking incisions” alongside these hairs.
4. Once the marking incision are made, move to and begin making incision in the defined zone BEFORE doing any work in the transition zone (Fig.16B)
This is one of the key techniques that help me to not get into trouble with too straight a hairline. By starting the defined zone first, and then moving anteriorly into the transition zone in an organized manner, I feel I have more control. I make the analogy to painting a wall. I do the easy central part first and than move to the fine trim last. Incisions in the defined zone are placed in a staggered pattern at a density of approximately 25 FU’s/cm2 creating “organized disorder”. (It is a miniaturized form of the “organized disorganization” that Unger has long recommended for slit grafting.) [3] When small grafts are placed at this density, the eye has difficulty recognizing this as a pattern. It is preferable to random placement, which can lead to unintentional skipped areas and an uneven distribution of hair density.
5. Create an initial framework for the transition zone (Fig.16C)
After the defined zone has been established, incisions are made that connect the aforementioned marking incisions to the defined zone. This creates an initial framework of multiple triangular-like bridges that connects the transition zone to the defined zone. (The tips of these triangular-like areas are the “marking incisions” that were initially made on the anterior border of the “transition zone”.) The shape of each bridge resembles an elongated triangle and contains approximately six to ten incisions. The base of these triangles extends into the “defined zone”. When this is finished, a framework has been created for an irregular pattern in the transition zone. These triangular areas will later become the areas of increased intermittent density that help to make the transition zone look more random and natural.
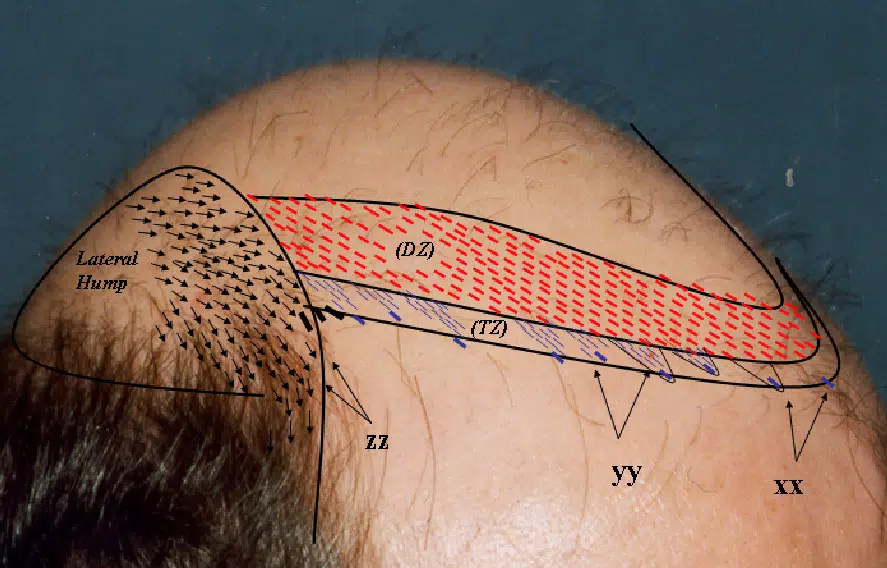
Fig 6C: LATER STEPS IN CREATING THE HAIRLINE: (xx) Marking incisions at anterior border of transition zone (TZ). (yy) Incisions that connect the “marking incisions” to the defined zone (DZ) creating an initial irregular framework with intermittent higher density. Multiple passes are made in the (TZ) to fine-tune this initial framework. (zz) Incisions in the fronto–temporalangle and lateral hump area use miniaturized existing hair for to follow the direction and angle.
6. Make multiple passes keeping the basic framework and ratio of density the same.
After creating this framework, multiple passes and artistic skills are used for refinement. These passes are made through the “transition zone”, filling in obvious spaces but keeping the same general pattern and being careful not to eliminate the irregularity. We try to create more incisions within the triangles than between the triangles. This accentuates the areas of intermittent higher density within the transition zone, promoting further irregularity and naturalness.
7. Place grafts using the principles of selective distribution and follicular pairing described earlier. (Figs. -6, 7, & 8)
This promotes a natural density gradient described earlier.
8. Fine tune the hairline at the end using the “Stick and Place” method.
About 100-300 grafts are usually saved for the end of the procedure, to further fine-tune the hairline. This is the point where the physician uses his artistic skills to look at the hairline and “stick and place” these extra grafts at points where they are needed. The physician can get an aesthetic feel for the way the hairline will look and what is needed because the hairs have been left 2-4 mm long. One-hair grafts are put in the transition zone if needed. If the transition zone is satisfactory then the one-hair grafts are paired to create two-hair grafts and placed in the defined zone. Once again, it is best to concentrate more grafts in the frontal tuft region because density in this region is crucial to an aesthetically pleasing affect.Fig -17 shows the results after one session of the patient whose steps where documented in Fig -16A,B,C. Figures 18 and 19 show further examples of hairlines created with this approach.
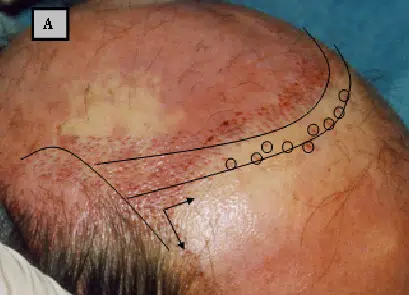
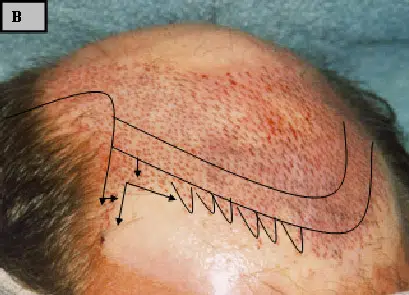
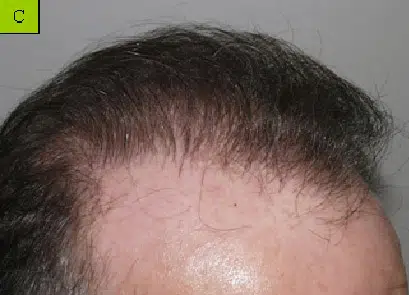
Fig-17 Before and after photo of the patient whose photos have been used in the previous diagrams (Fig 16,17,&18): A)Before photo showing early steps of surgery B) Before photo shows later steps of surgery and final pattern. C) Eight months after
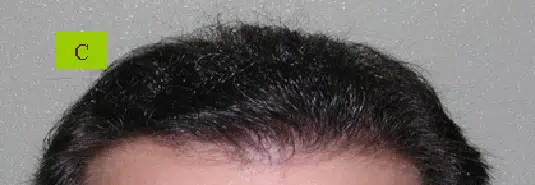
Fig-18: A)Patient GH before surgery B) Patient GH one year surgery with 2400 FUs C) Patient GH close up of hairline
Conclusion
The principles and techniques outlined in this paper will help the physician create hairlines with the high degree of naturalness and substance expected by today’s discerning patients. We can now establish a natural hairline during the first surgery that can stand on its own independent of further sessions. It is not enough to “just use micrograft”. Proper selection and use of FU’s combined with artistry and skill, provide us with the tools to follow natures lead in creating naturally appearing soft hairlines, while establishing the illusion of density. My approach is to create an initial framework based on the principles of hairline design and then use artistic ability and experience to fine tune this framework.
References
- Norwood OT., “Patient Selection, Hair Transplant Design and Hairstyle,” Jl Dermatol Surg Oncol., 1992;18:386-394.
- Marritt E., Konior R., Patient Selection, Candidacy, and Treatment Plan for Hair Replacement Surgery. Facial Plastic Surgery Clinics of North America, May 1994; 2:(2):111-137.
- Unger W., Knudsen R., General Principles of Recipient Site Organization and Planning. Hair Transplantation, 3rd ed., Unger W. (ed.), Marcel Dekker Inc., New York, 1995, pp. 105-158.
- Prawetz-Moser C., Nothing Is As Important As Planning and Designing the Frontal Hairline, HT Forum Intl., 1996; 6 (4):6
- Khan, Sajjad and Dow Stough. : Determination of Hairline Placement.” Dow B. Stough. Hair Replacement: Surgical and Medial. Vol. 1. New York: Mosby, 1996. Pages 425-429.
- Pomerantz M., Creating a Hairline, HT Forum Intl., 1999; 9 (6):184-186 and Dermatologic Clinics, April 1999; 17 (2):271-275.
- Stough Dow, “Hair Transplantation by the Feathering Zone Technique: New Tools for the Nineties, “ The American Journal of Cosmetic Surgery, Volume 9, No. 3, page 243-248, 1992.
- Shapiro R., State of the Art: Aesthetic Hairline, Annual Meeting of the European Society of Hair Restoration Surgery, Sitges, Spain, June 2001.
- Shapiro R. Creating a Natural Hairline in One Session Using a Systematic Approach and Modern Principles of Hairline Design. Int Journal of Cosmetic Surgery and Anesthetic Dermatology 2001; 3(2): 89-99
- Parsley W., Comparison of Natural and Surgically Created Transition Zones. 7th Annual Meeting of International Society of Hair Restoration Surgery, San Francisco, CA., October 1999.
- Martinick JH. Hairline Placement: Getting It Right the First Time. Hair Transplant Forum International 1999; 9(3): 65-71.
- Arnold James, Personal Communication, 1998
- Bernstein R., Rassman., The Logic of Follicular Unit Transplantation, Dermatologic Clinics, April 1999; 17 (2):277-296.
- Beehner M. A comparison of hair growth between follicular unit graft trimmed skinny vs. chubby. Hair Transplant Forum 1999; 1 p.16
- Seeger David. Dense Packing. Hair Transplant Forum International 2002
- Mangublat EA: Impulsive force: a new method to cut grafts. International Journal of Cosmetic Surgery 1998;6(1):19-23.
- Bheener M. Two Research Studies on Follicular Unit Growth”. Annual Meeting of the International Society of Hair Restoration Surgeons. Washington DC Sept 1998
- Swinehart J., Cloned Hairlines: The Use of Bisected Hair Follicles to Create Finer Hairlines. Dermatol Surg, 2001, 27 (10):868-972.
- Kim J.C. Regeneration of the human scalp hair follicle after horizontal sectioning: Implication for pluripotent cells and melanocyte reservoir. In: Van Neste DJ, Randall VA, eds. Hair Research for the Next Millennium. Science B.V. 1996, p.136.
- Harris James “Recombinant Follicular Unit Transplantion, Annual Meeting of the International Society of Hair Restoration Puerto Vallarta, October 22, 2001.
- Mayer, Mel “Recreating the Temporal Points” Annual Meeting of the International Society of Hair Restoration, Chicago Oct 2002